Table of Contents
ToggleThinking about a seamless rain gutter installation for your home? Seamless gutters are a smart investment that can reduce maintenance, prevent water damage, and boost your home’s curb appeal. In this guide, we’ll walk you through what seamless gutters are, the tools and materials you’ll need, the installation process, and when it may be time to call in the pros.
Why Choose Seamless Rain Gutters?
Unlike traditional sectional gutters, seamless rain gutters are made from a single continuous piece of material, eliminating the seams where leaks and clogs often form. Fewer joints mean less opportunity for debris to collect and water to escape. This design also gives your home a cleaner, more polished look.
Though seamless gutters may cost more upfront, they often require less maintenance over time and provide superior long-term performance. Their leak-resistant design makes them especially useful in climates with heavy rainfall or snowmelt, like Minnesota.
Tools and Materials You’ll Need
Proper preparation is key to a successful DIY seamless gutter installation. Here are the essential tools and materials:
Tools:
- Hacksaw or miter saw
- Drill or driver
- Pop rivet gun
- Tin snips
- Tape measure
- Extension ladder
- Chalk line
Materials:
- Aluminum seamless gutters (cut to custom lengths with a gutter machine)
- Downspouts and elbows
- End caps
- Brackets or hangers
- High-quality caulk or sealant
- Fasteners (screws or rivets)
Step-by-Step Seamless Rain Gutter Installation Guide
1. Measure and Plan
Measure your roofline to determine the total gutter length needed. Mark the highest and lowest points of the gutter run, allowing for a slight slope (typically 1/4 inch for every 10 feet) to encourage water drainage.
2. Prepare the Fascia
Before installation, inspect the fascia boards for rot or damage. Replace any compromised wood to ensure a secure foundation for the new gutters.
3. Cut and Cap
Use a miter saw or tin snips to cut the gutters to your required lengths. Attach end caps securely with sealant and rivets to ensure watertight ends.
4. Mark Hanger Locations
Mark hanger or bracket placement every 2 feet along the fascia. More hangers may be needed in regions with heavy snow or rainfall to prevent sagging.
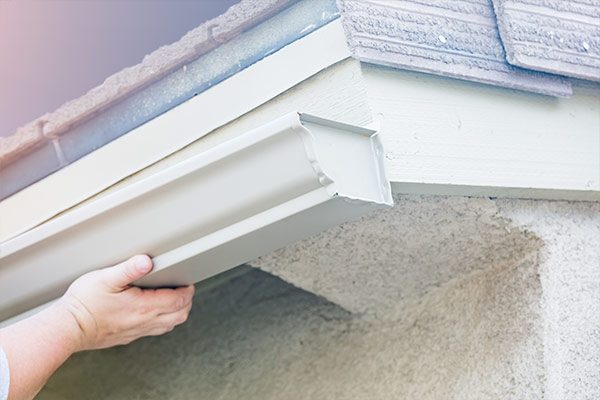
5. Attach the Gutters
Secure the gutter sections to the fascia, aligning them with your slope line. Use brackets or hangers to hold the gutter firmly in place and ensure it follows the slope for proper water flow.
6. Install Downspouts
Drill holes where downspouts will be attached. Use elbows and extensions as needed to direct water away from the home’s foundation. Secure with fasteners and seal all joints with caulking.
Common Gutter Installation Mistakes to Avoid
- Skipping rot inspection: Installing gutters over rotted fascia can lead to sagging and failure.
- Incorrect slope: Gutters that are too level won’t drain properly, causing standing water and overflow.
- Too few hangers: Inadequate support can cause gutters to pull away from the house.
- Poor sealing: Failing to seal end caps or joints properly invites leaks.
Benefits of Seamless Rain Gutters
- Reduced risk of leaks thanks to their continuous design
- Lower maintenance due to fewer areas for debris to collect
- Improved aesthetics with a streamlined, modern appearance
- Better protection against foundation damage and erosion
With fewer joints and a custom fit, seamless rain gutters last longer and perform better than traditional sectional systems.
Seamless vs. Sectional Gutters: A Quick Comparison
Cost
Seamless gutters generally cost more upfront ($1,650–$2,750 installed) compared to sectional gutters ($750–$1,500). However, seamless options typically pay off through lower repair and maintenance costs over time.
Installation Time
Professional installers can often complete seamless rain gutter installation in a few hours. DIY sectional systems may take longer due to extra joints and connections.
Performance
Seamless gutters last longer (15–25 years) and are less prone to leaks than sectional systems, which often need repairs within 10–15 years.
Choosing the Right Material
- Aluminum: Lightweight, rust-resistant, and cost-effective
- Steel: Durable but heavier and may rust over time
- Copper: Premium look, high cost, lasts 50+ years
- Zinc or Galvalume: Long-lasting and corrosion-resistant, but expensive
DIY vs. Professional Installation
While it’s possible to install seamless rain gutters yourself, it’s not always practical. A specialized machine is needed to shape seamless gutters on-site, and improper installation can lead to poor drainage or water damage.
DIY installation may work for experienced homeowners installing pre-cut sections, but professional installation ensures precision, safety, and warranty-backed workmanship. Hiring a pro often leads to better results with fewer long-term issues.
Why Choose Roofs R Us for Seamless Gutter Installation in MN
At Roofs R Us in Blaine, MN, we specialize in custom seamless rain gutter installation designed to handle Minnesota’s toughest weather. Our experienced team uses high-quality materials and professional-grade equipment to ensure a precise fit and long-lasting performance.
We offer:
- Free consultations and estimates
- Custom onsite fabrication
- Durable aluminum and copper options
- Expert installation with industry-best warranties
Protect your home from water damage with professionally installed seamless gutters tailored to your property.
Trust Roofs R Us for Seamless Rain Gutter Installation
Seamless rain gutters are a worthwhile investment for homeowners seeking durability, low maintenance, and effective water drainage. Whether you’re considering a DIY project or opting for professional help, understanding the process and benefits will help you make an informed choice.
Need expert help? Contact Roofs R Us today for a free, no-obligation consultation and discover why we’re Minnesota’s trusted name in seamless gutter installation.